Showing posts with label gloves and mittens. Show all posts

Friday, June 1, 2012

FO Friday: Mitts, Etc.

Hey, look! They're done!

Pattern: My own handy formula for making fitted fingerless gloves.
Yarn: Filatura di Crosa 501, Color #600.
Needle:  US #6 & 8
Notes: Next time, I think I'll use smaller needles. I like these to be at a somewhat tighter gauge. 


Wednesday, May 23, 2012

WiP Wednesday: Putting the Gloves Before the Scarf

A few weeks ago, I decided to make a clapotis out of some yarn a random Raveler gave me last summer. I have seven skeins of Filatura di Crosa 501 in the 600 colorway. Each skein contains 137 yards of yarn, way more than I need for the scarf itself. So, I decided to go ahead and make a set of mitts to go with it:


So far, so good! I'll be posting a picture of the scarf-in-progress sometime next week. I imagine it'll take me a good while to finish it; I'm only 1/6th of the way done as of now. 

Friday, March 16, 2012

FO Friday: Matchy-Matchy Gloves

As expected, I finished the mitts before I finished the scarf. Hopefully, the scarf will be done soon. 


Pattern: My Fingerless Gloves Formula, which I adapted from Pam Allen's Progressive Gloves pattern. 
Yarn: Fortissima Graffiti Colori
Needle: US #2 & 3
Finished Size: Fitted! 


I like how you can see my dad's truck in the background. Pro!

Friday, February 3, 2012

FO Friday: Tonks Fingerless Gloves

My January Mittens project is complete:

Pattern: Progressive Gloves by Pam Allen
Yarn: Opal Harry Potter sock yarn in the Tonks colorway
Needle: US #1
Finished Size: Sized to fit my elfin hands, yay!


They match a hat I made a few years ago. This is why I save leftover yarn, people! 

Wednesday, January 25, 2012

WiP Wednesday: Fingerless Mitts

I started these almost two years ago, but never got around to finishing them.

I have a hat to match, and I'm looking forward to wearing them all together-- if it ever gets cold. Seriously, this is one of the warmest winters I've experienced in this area.

Friday, December 16, 2011

FO Friday: Campout Gear

Pattern: Camp Out Fingerless Mitts by Tante Ehm
Yarn: 
Noro Kureyon in #242
Needle: US #8

Finished Size:  Almost to my elbow!

I made a hat to go with the mittens. Pattern here!

Saturday, July 2, 2011

One down, one to go!

My second try at the Love Bytes mittens is halfway done! So far, I like them a lot better than the first installment; the yarn is far less fuzzy, the green pops more, and I'm getting better at fair isle-- though you can still see where it's a little bit bunchy. That should come out with a good blocking, though.

Thursday, June 2, 2011

How to Make Fitted Fingerless Gloves/Armwarmers, Part 3

You can reach parts one and two here and here, respectively.

We have now arrived at Part 3: Converting the Numbers into a Pattern. 

I know that it sounds intimidating, but translating numbers into a pattern is surprisingly easy. All you have to do is plug the numbers on your hand turkey into a series of simple formulas. First, though, you have to make a couple of decisions: whether to have individual fingers or a ribbed cuff at the top, and whether to start from the top (at the fingers) or the bottom (at the wrists). Each option has its pluses and minuses. Individual fingers are fiddly, but warmer than a cuffed top. They can also be made longer without sacrificing dexterity. Most knitters find it easier to work mittens from the wrist to the fingers, as it's easier to visualize and try on the mittens as one goes, but knitting fingers to wrist ensures that less yarn will go to waste (some of us really dislike having thousands of tiny balls of sock yarn floating about the house). At the end of the day, it's a matter of personal preference.

For the purposes of this exercise, I elected to do a ribbed cuff at the top, working from fingers to wrist. Numbers in (parentheses) are ones that I pulled from my hand turkey. You should make sure to use your own!:

  1. Cast on the number of palm stitches (52) with a needle one or two sizes down from the one you intend on using for the main part of the glove, and work 5 rows of 2 x 2 (knit 2, purl 2) ribbing. 
  2. Switch to larger needles and work (15) rounds of palm stitches to obtain the desired length of mitten between fingers and thumb opening.  
  3. Using waste yarn, cast on the (13) stitches needed to bring the stitch count up to (65), in order to accommodate the wider part of the palm/thumb.
  4. Take a break to calculate the gusset. I'm starting with (65) stitches, I need to get down to (48) stitches for my wrist, and I have (2.5) inches, or (25) rows, in which to do it. (65-48 = 19) stitches to decrease. Since I'll be working one decrease on each side of the gusset, and losing 2 stitches each decrease row, I'll need a total of (9) decrease rows (plus an extra at the end). Rounding up to (27) rows to make the math easier, I'll need to decrease every (third) row. 
  5. Once my calculations were finished, it was time to place the gusset. The (13) cast-on stitches would form the center of it, but a few of the palm stitches would need to be incorporated in order to get to (48) at the end. Starting at the midpoint of the palm stitches (in between 26 and 27), count (23) stitches on each side, placing a marker at each spot. 
  6. Work the gusset by knitting (2) rows, then a decrease row, until you have reached the number of wrist stitches you need (48). I prefer to use mirrored decreases (ssk on one side, k2tog on the other) for reasons of symmetry, but that's a personal preference. Either way, the decreases are placed on the first two stitches inside the stitch markers. You won't need to move the markers at all. 
  7. Once the gusset has been completed, it's time to calculate wrist increases using the same method as the gusset decreases. Since I'm going from (48) to (56) stitches over (3) inches and my increase rows increase two stitches at a time, I'll need (4) increase rows over (30) rows, so every (seventh) row (and I'll work a few extras at the end to make up the difference to (3) inches. As far as placement goes, I divide the number of stitches in eighths, and place the increases in the 7/8ths spot. For a (48) stitch wrist, I place the increases around stitch (40). I use mirrored M1 increases, but it's not necessary as the decreases will be on the underside of the wrist.
  8. Once the wrist increases are complete, switch back to the smaller needles, work 10 rounds of k2, p2 ribbing, and cast-of using a stretchy bind-off. Personally, I like Elizabeth Zimmerman's sewn cast-off.
  9. Now it's time to go back and finish the thumb. Unravel the provisional cast-on, placing the (13) stitches on two DPNs. Using a third DPN, cast on (7) stitches to get to the number of stitches (20) you'll need for the thumb, amking sure to leave a fairly long (4-5") tail. Work (5) rows in stockinette, then switch to smaller needles and work 5 rows in k2, p2 ribbing. Cast off loosely.
  10. After that, it's all finishing! Weave in ends and sew up the gap between the cast-on edge of the thumb and the palm stitches using the tail of the cast-on edge. 
  11. Make another, making sure to place thumb gussets and wrist increases on the opposite sides of the glove to achieve symmetry. 

To do the same pattern from the other direction (wrist to cuff), do the same thing in reverse, doing increases instead of decreases, and placing thumb stitches on a stitch holder instead of using a provisional cast-on.

When knitting gloves with individual fingers, it's a lot easier to knit them wrist-to-cuff, simply because the only way I've been able to do fingers-to-wrist gloves with individual fingers is as follows:

  1. Before casting on, set aside ~20-30 yards of yarn, depending on gauge and finger and palm length.
  2. Provisionally cast on upper palm stitches.
  3. Work half of the number of rows needed. 
  4. Place live stitches on waste yarn or stitch holders (or else use a second set of double-pointed needles for the next step).
  5. Unravel provisional cast on, placing stitches on DPNs. 
  6. Using second ball of yarn, knit the second half of the number of rows needed for the palm.
  7. Work the fingers, still using second ball of yarn.
  8. Pick the stitches on waste yarn/holders/first set of DPN's up and complete pattern as normal.
In short, it's kind of a pain in the ass, and I'd rather have yarn scraps. 

So, cast on from the bottom and work as you would for a normal wrist-to-fingers glove. Once the palm stitches are finished (they should be flush with where your fingers separate), you're ready to start.

First, though, a bit of math. You already know how many stitches each finger requires from Part 2. Now, you need to incorporate those numbers into the live stitches. You can't simply divide them evenly, as fingers are different sizes and the ones on the ends of your hands (pinky and index) will require more of the palm stitches.  Figuring this out sounds complicated, but it's quite simple once you think about it. 

While fingers are circular, for the purposes of this exercise, it's useful to think of them as a series of rounded squares (individual stitches) within a larger rectangle (the palm stitches). I start with the index finger and the pinky finger and work my way to the middle as follows:
  1. The index finger is a square that has a perimeter of 19 stitches. As three-quarters of the sides of this square are part of the larger rectangle (palm stitches), I will need to use 14 palm stitches (7 on one side of the beginning of the row, and 7 on the other) and cast on 5 stitches of my own. 
  2. The pinky is a square that has a perimeter of 16 stitches. Three-quarters. of sides of this square are part of the larger rectangle. I will need to use 12 palm stitches (6 on one side of the halfway point of the row, and 6 on the other) and cast on 4 stitches of my own. 
  3. At this point, I have used 26 of the 52 palm stitches. 26 remain. 
  4. Both the middle and ring fingers are squares that have two sides that are part of the larger rectangle. Since my middle finger is slightly larger than my left finger, I will use 14 of the edge stitches, 7 on one side, 7 on the other, and will cast on two stitches in between each side to connect them. 
  5. This means there are twelve stitches left for the ring finger, so I'll need to cast on two stitches in between them as well. 
If that sounds a bit confusing, here's a simple MS paint diagram I threw together:


I knit the fingers one at the time, keeping the unused edge stitches on waste yarn or a stitch holder. When finishing, it helps to use a less stretchy bind-off, as these help to reduce curling. Just don't cast off too tightly; I don't want to be responsible for any blue fingertips! As for the seams created by the cast-on edges, simply sew them together like you did with the thumb. Weave in the multitude of ends, and you're done!

Here endeth the lesson.

Coming soon: Part 4: Knitting!

Friday, May 27, 2011

Fingerless Gloves Sample: Progress!

As you can see, I'm almost finished with the first glove that I'm using to test my tutorial on designing one's own fitted fingerless gloves/armwarmers. I realized the yardage in Aslan Trends Santa Fe yarn is a little shorter than the usual 50g skein of sock yarn, so I decided to omit the fingers. All that's left is finishing the wrist ribbing and the thumb, so I should be able to post Part 3 very soon.

Saturday, May 21, 2011

How to Make Fitted Fingerless Gloves/Armwarmers, Part 1

I've been meaning to do a series of tutorials on fingerless gloves or armwarmers for a while now. For the most part, I don't like to knit from patterns for fitted items like socks or gloves because they almost never come out fitted. Much better, in my opinion, to do the extra legwork from the beginning and ensure they come out right. I came to that conclusion after completing three pairs of wristwarmers that all had baggy wrists and upper cuffs. You see, I have very skinny wrists and small, short hands with stubby fingers, and knitting gloves this way allows me to compensate for that.

Part 1: Planning and Swatching

Step 1:  Select your yarn. I recommend fingering or sport-weight yarn for heavy-wear items like socks and fingerless gloves. The greater number of stitches per inch, the more durable they will be and the longer they will last. I do not, however, recommend using laceweight (unless it's heavyweight superwash laceweight like Ella Rae or Wollmeise, which are really more light fingering weight than laceweight), as it's not always plied and tends to be a bit too delicate. As far as fiber content goes, I get best results from superwash wool or wool/nylon blends, the more tightly-spun plies, the better. Wool is elastic without stretching unpredictably, and is very durable and less prone to pilling. I don't recommend using cotton, which is inelastic and prone to shrinkage (and color fading), or alpaca, which pills like a mofo and stretches all over the place, or 100% synthetics, which can't be blocked and don't breathe.

Yardage requirements depend on three important factors:
  1. How big your hands are.
  2. Whether or not you want to do half-fingers.
  3. How long you want them to be. 
I've found I can squeeze a pair of half-finger gloves that go just past my wrist out of a 50g, 200-ish yard skein of fingering weight sock yarn and still have some left over. Of course, I do have fairly small, short hands (I'll provide my measurements in the next entry in this series). If you have larger hands or want longer gloves/full fingers, you may want to get a second skein. 

Step 2: Make a gauge swatch in the round. I know, I know, nobody likes to make gauge swatches. Sadly, when it comes to fitted garments of any kind, it's really necessary, as is doing a swatch-in-the-round for something that will be knitted that way. Most knitters' gauge changes when they switch from knitting flat to in the round (particularly if they knit continental style), and that can really affect the fir of the finished project. I usually try to do a 30 x 30 swatch, measuring the stitches in the middle of the square. If you're planning on blocking the finished project (I generally don't block socks and wristwarmers), you need to block the gauge swatch as sometimes washing can change gauge counts. I've found this happens less frequently with the superwash wool/nylon blends commonly used in fingering weight sock yarns, but it happens quite often with heavier, 100% untreated wool yarns.

You should shoot for a gauge in between 7-10 stitches per inch. Anything with fewer stitches won't wear as well and may pill with wear and use, and anything with more than that will take for-freaking-ever to finish. I usually wind up in the 8-9 range.

As for doing a gauge swatch in the round, I use this method, which is quick and easy to measure. Again, make sure to measure the stitches in the middle of the swatch, as this method does distort the edges.

Once you've completed these steps, you can move onto Part 2: Measuring and Math. I promise, I'll make the math as painless as possible.

Monday, May 16, 2011

Beach Knitting Docket!

So, my list of what I'll be knitting at the beach has been finalized:

  • Complete second attempt at an Aeolian shawl
  • Complete Omelet shawl
  • Start and finish Orchid Thief shawl
  • Work on second Juneberry shawl (may not have enough yarn with it to finish, don't want to pack more)
  • Generic fingerless gloves (may be posting a tutorial)
  • Second iteration of Idiot-Proof Sideways Scarf
I seriously doubt I'll be able to finish it all but it's worth aiming high. 

Thursday, February 24, 2011

Take Two

Here beginneth my second attempt at the Love Bytes mittens (which will be replacing the ones my evil-ass cats destroyed a month ago). Now with new yarn and 75% less patience!

I'll be in Nashville all weekend, and I doubt I'll have time to update until Sunday night or Monday. Have a good one, all!

Wednesday, February 2, 2011

FO: Nunt's Cabled Wristwarmers


Pattern: Nunt's Cabled Wristwarmers, by Nunt
Yarn: Paton's Kroy Sock in Gentry Grey
Needle: US #2
Finished Size: Small enough to fit my elfin wrists and hands.
Notes: I wouldn't necessarily recommend using such small needles. I have tiny hands. I think most adults would need to use at least a size 3, if not bigger. 


Overall, I'm really happy with how these turned out!


Two down, 109 left to go in the 111 in 2011 challenge! 

Sunday, January 16, 2011

SGS: Second Glove Syndrome

Much like Second Sock Syndrome, Second Glove Syndrome affects impatient, easily bored knitters everywhere and ensures that there are no fewer than three single gloves/mittens/armwarmers in my WiP pile at any given moment.

Saturday, January 8, 2011

Wristwarmers!

My first project of 2011 is a set of wristwarmers. One of my goals is to make more items that I'll actually wear; while that rainbow multicolor may look good on the shelf, I will never wear the item knitted from it in public. Even though grey is a boring color by comparison, I'll probably get a lot of wear out of them later.

I keep my knitting in a cookie tin so that the cats can't mess with it. Because, as we all know, cats are jerks who destroy yarn and handknits.

Thursday, December 30, 2010

This is why we can't have nice things.

Cats are assholes.

I am telling myself that this is for the best. Much as I loved my mittens, the yarn was not a good choice. It wasn't plied very tightly, the texture was uneven, and it was fuzzing and pilling all to hell as I was knitting with it. They probably wouldn't have lasted long even if the kittens hadn't destroyed one of them.

Or so I keep telling myself.

Luckily for the cats, I already have a quantity of black Cascade 220 in my possession (which is a much better yarn choice for the project in the first place: tightly plied and quite sturdy), so all I need to re-knit the mittens is a $6 skein of lime green 220. That should be gotten easily enough, and I needed to go to the yarn store anyway. I am chronically bad at underestimating how much yarn I'll need for a given product, and need to pick up another skein of some Noro before they run out of that dyelot.

I'm still pissed at the cats, though. It's a good thing they're cute.

Monday, December 27, 2010

We'll call this one "Cabin Fever"

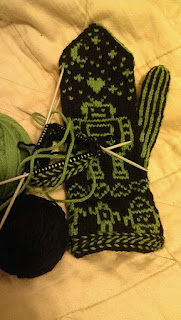
Why yes, that is a stranded mitten with robots and hearts on it.

I'm about halfway done with the second one.